Knife Image Editing
Professional photos show you take pride in your work.
No shipping fees or worries!
Professional photos created from your phone pictures.
Professional photos created from your phone pictures.
Editing Services & pricing
Photo edits are made from the photos you take on your cell phone!
Sheaths are included at no extra cost!
Extra Fees:
- Photo Print $20
(per image edit)
Includes 5x7 and 8x10.
- Reformat Image Service $25
Adjust image to fit your needs, such as a business card or facebook banner.
- Display Stands $30
- Photo Print $20
(per image edit)
Includes 5x7 and 8x10.
- Reformat Image Service $25
Adjust image to fit your needs, such as a business card or facebook banner.
- Display Stands $30
Bundle Discount!
When you submit two or more orders at one time, get 10% off the final price.
*Please submit a new order form for each order.
*Please submit a new order form for each order.
Show Photography
I currently only offer photography at shows. But if you're interested in mailing me a knife to photograph, please contact me and we can chat.
| jfrasier_photography_form.pdf |
Click "download file" above to open and print the info sheet. Fill it out and bring it to me at the show! These will also be available at my table to fill out in person.
2024 Show Line-Up
June 7-9 → Blade Show Atlanta
August 2-3 → Natural State Knife Show
August 9-10 → Idaho Knife Show
September 14-15 → Louisiana Knife Show
September 28-29 → Lost Pines Knife Show
October 4-5 → Blade Show West
2024 Show Line-Up
June 7-9 → Blade Show Atlanta
August 2-3 → Natural State Knife Show
August 9-10 → Idaho Knife Show
September 14-15 → Louisiana Knife Show
September 28-29 → Lost Pines Knife Show
October 4-5 → Blade Show West
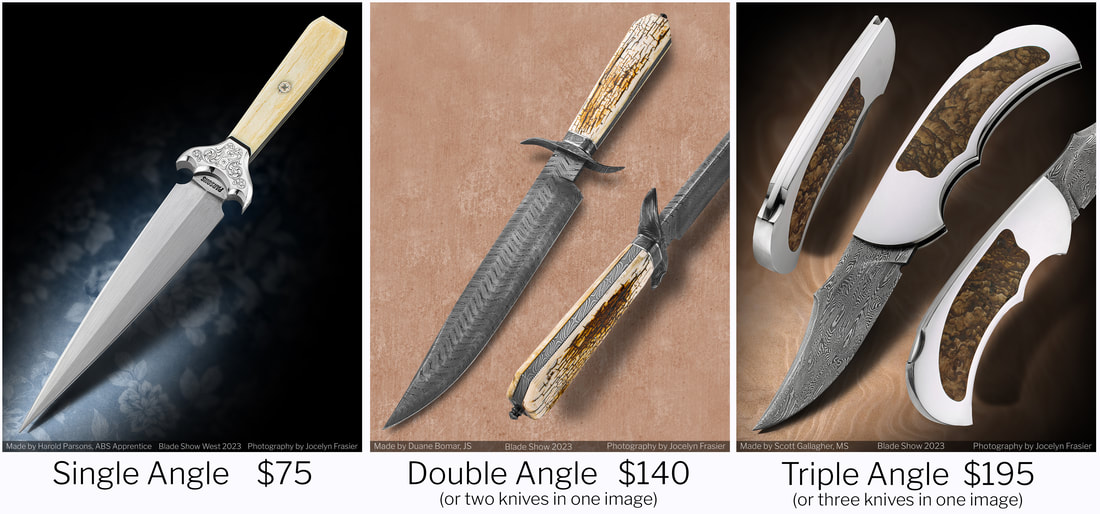
Photography Pricing:
Single Angle → $100
Double Angle → $160
Triple Angle → $210
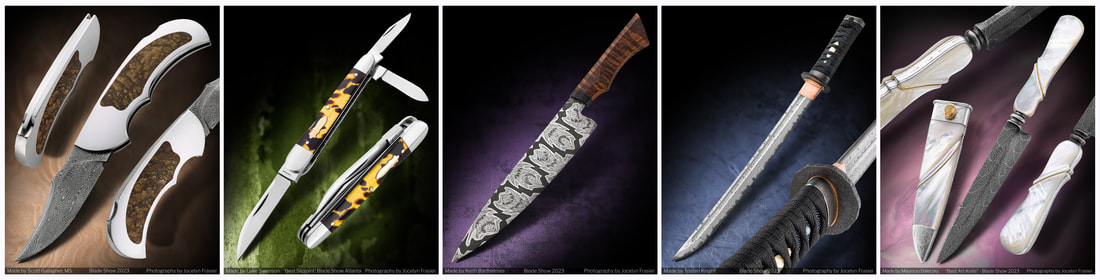
ABS Sets → $220
Stands, displays, swords over 30" → Extra $50
3+ images together is discounted 15%
Photo prints are included. All photos are submitted to magazines.
Single Angle → $100
Double Angle → $160
Triple Angle → $210
ABS Sets → $220
Stands, displays, swords over 30" → Extra $50
3+ images together is discounted 15%
Photo prints are included. All photos are submitted to magazines.
payment info and wait time
Paypal is my preferred payment method. Credit card, money order, or venmo are also available.
An invoice will be sent after you review and approve the completed image.
After approval & payment, photos are final. Requests to make any adjustments to the image after this cannot be made.
Wait time:
It generally takes about a week to complete a photo edit order once I verify the images will work. It may take longer or shorter depending on the number of orders coming in. I will keep in contact with you on the progress.
Photo taking tips
You don’t need fancy equipment to get good pictures. You just need your phone camera, your knife, and a piece of paper. Scroll down to see picture examples and links to video tutorials.
To avoid disappointment: I highly recommend you keep the knife in your possession until photos have been approved by me. This way if I need different pictures, we can still make things work.
Pictures should be full size and unedited.
Before you take photos:
→ Please clean your knife/sheath and be sure that it is free of fingerprints and dust.
→ Your knife should be completed. That is, make sure it's free of scratches and the blade is not damaged. I will not remove blemishes that are in the knife, just dust and hair.
Take your knives outside:
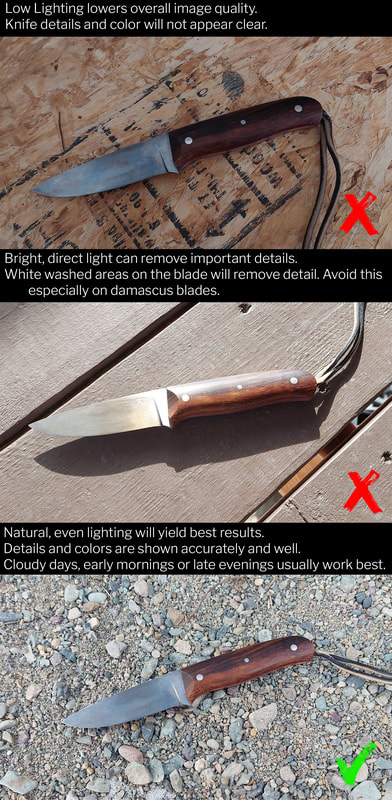
→ Natural lighting will provide the best results to accurately capture color and detail.
→ Try and avoid direct sunlight. It can cause harsh shadows and wash out details. But this can be fixed by blocking light with a piece of paper.
→ Early mornings or late evenings work great, or in shade on sunny days.
General tips to consider:
→ Do no have any fingers obstructing the view of the knife if you choose to hold it in your photos.
→ Place your knife on a plain background if possible, to minimize reflections into the knife. Plain paper or white sheets work perfect.
→ Make sure most of the image is in focus. You can tap the screen on your phone to choose where the camera focuses on your knife.
→ Having difficulty with reflections? This is where the piece of paper comes in. Use that to block reflections or harsh lighting.
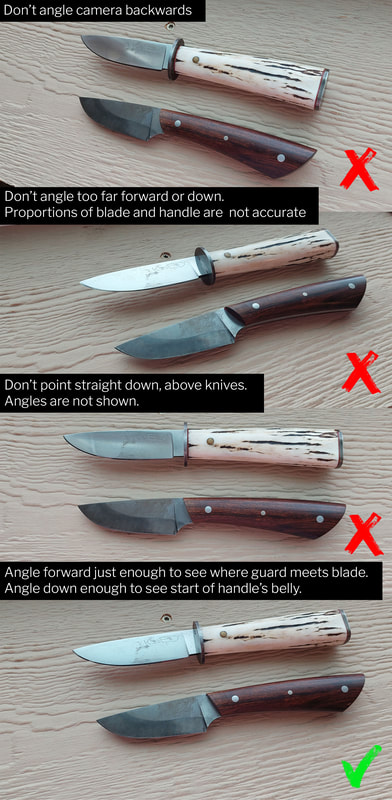
Multiple Angles:
→ Take a picture of the full view of your knife, then flip the knife over and take photos of the other side for a second angle! This way you don't show off the same side of the knife twice.
→ Don't get in too close to the knife on the detail shots - otherwise it will limit my options for placement.
Sheaths:
→ Take at least one photo with the sheath and knife together. This shows me the proper sizing and proportion between them.
Fine Damascus Patterns:
→ You’ll want to make sure you have bright, indirect lighting for these. If the image is too dark or too bright, the detail of the damascus can get lost and not show it off correctly.
Finally:
→ Take a bunch of photos with different lighting and angles and send them all to me. (Literally, all of them.) I can choose the best photos from there. I’d rather have too many photos than not enough.
Need more help?
→ Feel free to shoot me a message if you have any questions or concerns.
To avoid disappointment: I highly recommend you keep the knife in your possession until photos have been approved by me. This way if I need different pictures, we can still make things work.
Pictures should be full size and unedited.
Before you take photos:
→ Please clean your knife/sheath and be sure that it is free of fingerprints and dust.
→ Your knife should be completed. That is, make sure it's free of scratches and the blade is not damaged. I will not remove blemishes that are in the knife, just dust and hair.
Take your knives outside:
→ Natural lighting will provide the best results to accurately capture color and detail.
→ Try and avoid direct sunlight. It can cause harsh shadows and wash out details. But this can be fixed by blocking light with a piece of paper.
→ Early mornings or late evenings work great, or in shade on sunny days.
General tips to consider:
→ Do no have any fingers obstructing the view of the knife if you choose to hold it in your photos.
→ Place your knife on a plain background if possible, to minimize reflections into the knife. Plain paper or white sheets work perfect.
→ Make sure most of the image is in focus. You can tap the screen on your phone to choose where the camera focuses on your knife.
→ Having difficulty with reflections? This is where the piece of paper comes in. Use that to block reflections or harsh lighting.
Multiple Angles:
→ Take a picture of the full view of your knife, then flip the knife over and take photos of the other side for a second angle! This way you don't show off the same side of the knife twice.
→ Don't get in too close to the knife on the detail shots - otherwise it will limit my options for placement.
Sheaths:
→ Take at least one photo with the sheath and knife together. This shows me the proper sizing and proportion between them.
Fine Damascus Patterns:
→ You’ll want to make sure you have bright, indirect lighting for these. If the image is too dark or too bright, the detail of the damascus can get lost and not show it off correctly.
Finally:
→ Take a bunch of photos with different lighting and angles and send them all to me. (Literally, all of them.) I can choose the best photos from there. I’d rather have too many photos than not enough.
Need more help?
→ Feel free to shoot me a message if you have any questions or concerns.
|
Lighting Tips. Click here for video guide.
|
Full view tips. Click here for video guide.
|
Detail shot examples. These are basic examples, you can take different shots depending on what you want to highlight.
Click here for the video guide.
Click here for the video guide.

PUBLIcations
I send all images to various publications including:
Photos placed in my online knife gallery and shared to my social media pages for thousands of people to see!
- Blade Magazine
- Knives Annual
- Knife Magazine
- Knives Illustrated
- ABS Journal
- Nothing But Knives
- La Passion des Couteaux (France)
- Messer Magazin (Germany)
- Excalibur (France)
- Coltelli (Italy)
Photos placed in my online knife gallery and shared to my social media pages for thousands of people to see!
DISCLAIMER
Image Editing Service
I strive to provide accurate and honest representations of knives and sheaths as they appear in real life. My services only digitally enhance your photographs. Dust and hair may be removed, but I do not remove or fix mistakes on your work such as scratches, cracks, chips, etc.
Adjustment Requests After Payment
Photos are final after you have approved the image and provided payment. Requests to make any adjustments to the image after this cannot be made.